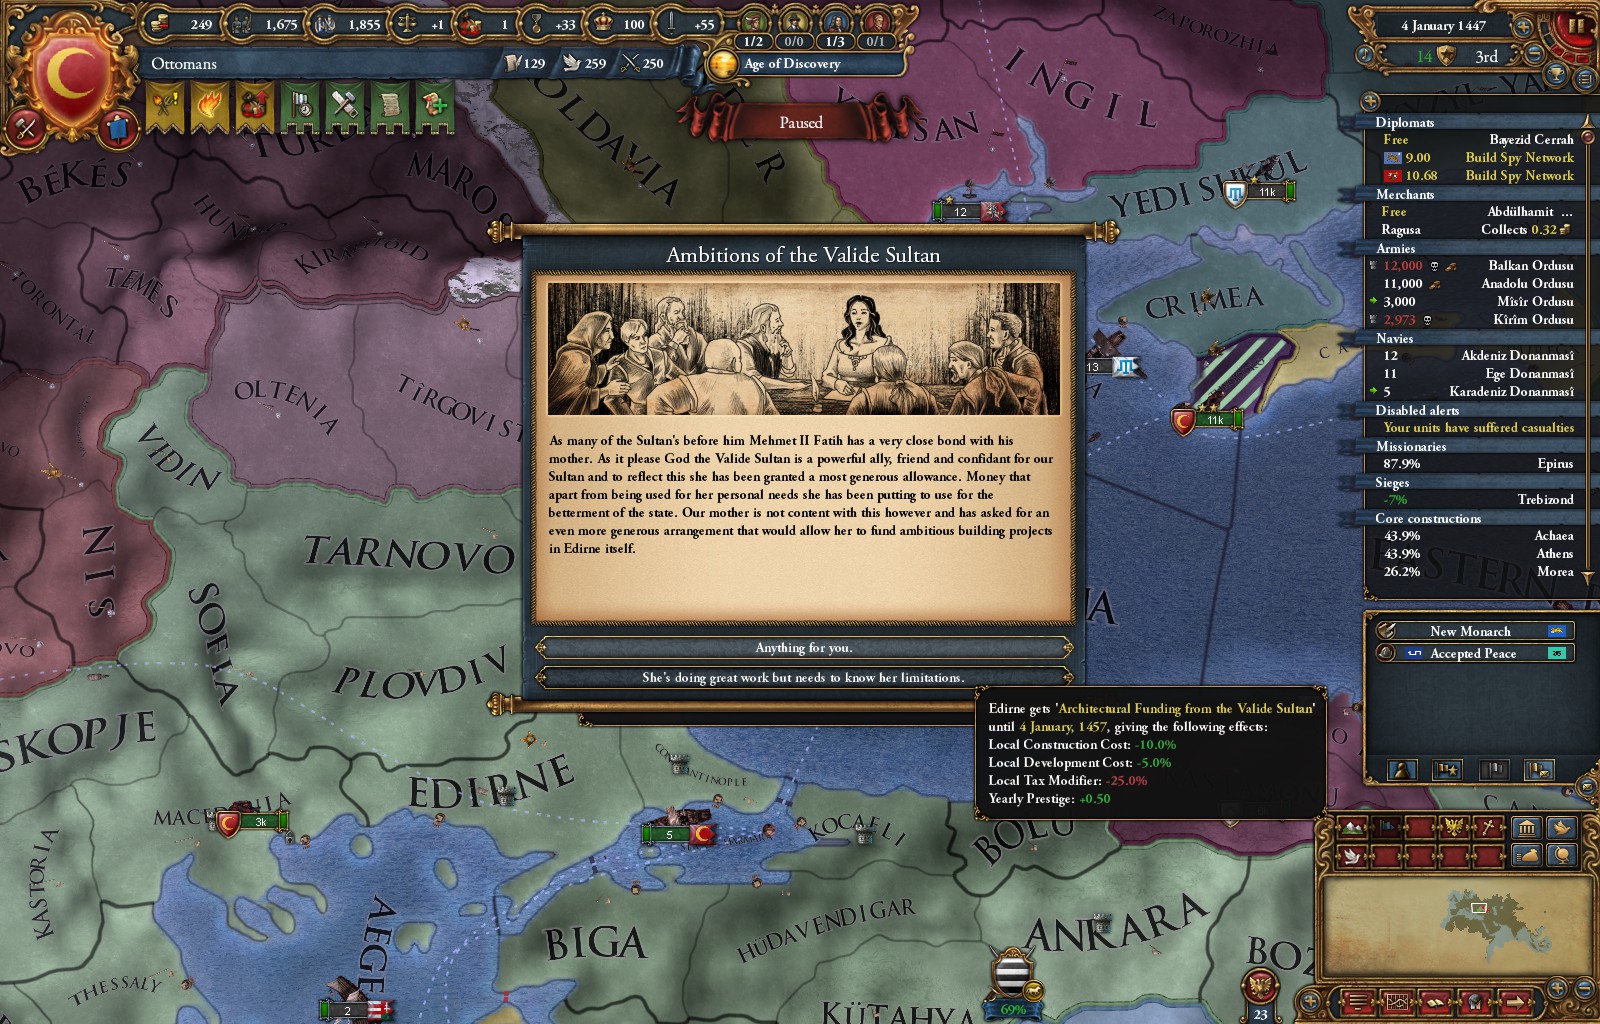
Let’s Play Europa Universalis IV: More Unexpected Weirdness

Date: March 1451

Country Size: 39 Provinces (plus vassal Georgia)

Status: Unsure on how to proceed.

As I half-expected, as soon as I fire up the game, the coalition against me dissolves for want of participants. A coalition needs at least four members to be viable, and the coalition against me had formed with too few members to sustain it (many were only technically eligible to join, and once their AE ticked down in January the coalition ceased to be even theoretically sustainable.)

Still, it’s a problem to consider, and one that probably means I’ll wait at least another year before going to war. It also means my next target is probably Wallachia, just to remove one high-AE country from the map. By my calculation, Hungary is not going to get into Coalition levels of AE if I vassalize Wallachia.

Wallachia has 39 development. Hungary adds a 25% for that value because they’re in the same culture group. Add to that 4.42% from my own development. So figure about 42 AE base, minus 6.6% from my prestige (so let’s call it 40 base AE)

Since I’m planning on vassalizing Wallachia, that’s a 50% reduction, taking it to 20 AE. Then a border hop should reduce that a bit.

Hungary has 30 AE already, and it’ll be a bit lower by the time I peace out with Wallachia. So I should be barely OK.

The war actually goes quicker than expected, but by a combination of improving relations with a bunch of faraway countries, and a lucky event that gives me a bunch of free prestige, I barely manage to vassalize Wallachia without risking a coalition forming.

But now it’s time to let Europe relax a bit, and to allow my armies to recover. We have one more easy core recovery, which I’ll get to right now, and then it’s war against Qara Qoyunlu… after a long, relaxing period of recovery (and possibly a quick invasion of Crimea.)

I swallow Crimea (again skirting the edge of a Coalition) then return my troops to prepare for an invasion of Qara Qoyunlu. In this case, I should be able to avoid the worst of the AE: my goal in that war is to recover some of my cores, and to force Qara Qoyunlu to release Syria as a free state (which I’ll then diplomatically vassalize.)

Unlike my other wars so far, Qara Q. is roughly my equal (at least in my current manpower-depleted state). Which means I need to fight smart. In this case, this means making sure not to engage the enemy without a significant numerical advantage, and otherwise not making dumb mistake. And by the by, I manage. I grab my objectives, liberate Syria, and grab an early peace deal (in this case willingly: I’m not up to grabbing too much aggressive expansion)

And then Hungary, now a world power, allies with the Mamluks. Ouch. That just became a small nightmare. Breaking that Alliance is a priority (it’s not complicated, I can fabricate a claim on Cyprus, which is guaranteed by the Mamluks, and drag them in a war. Then I just need to beat the Mamluks and get them to break their alliance with Hungary as part of the peace deal.)

If I don’t break that alliance, I will be stuck with two avenues of expansion blocked, and I’ll be at the mercy of any coalition forming that includes one of those two states. And such a coalition would be inevitable: either I expand in Christian lands which would make Hungary eventually go into Coalition, or in Muslim lands in which case the Mamluks would join..

But that means it’s time for a big war.


MECHANICS: Battles (pre-artillery)

You’d think that for a game about world conquest, battles would have been one of the subjects I’d have covered early. But EU4 combat is quite abstracted, and it’s not something that I bother micromanaging.

But let’s cover them now, while they’re still relatively simple.

Armies are made of thousand-men regiments. Regiments can be infantry, cavalry or artillery. We’ll cover artillery later, when it finally enters the fray, but for now I can only field infantry and cavalry.

Cavalry is more expensive, but much more powerful and durable than infantry. However, barring a few exceptions, you need lots of infantry to support your cavalry or your army will take a tactics penalty. Also, infantry takes the brunt of losses, so you need to have extra infantry to compensate for that.

To compound that, terrain also affect how many regiments can join the battle, as do your tech level, through a concept called combat width. Basically, your troops form a line of regiments (infantry covering most of the center position, and the last few spots on each side of the line being occupied by your cavalry.

The tech level determines the maximum possible width, and terrain reduces it. Once artillery enters the game, it can fire from a second row of regiments onto the enemy army, but otherwise you’re stuck with that line formation.

I imagine that with knowledge of the algorithms of the game, it would be possible to work out the very best army composition for any situation, but that would require a degree of micromanagement that would drive anyone insane. Instead, I usually just build a stack with a composition I like (in pre-artillery combat, I’ll have 4-6 cavalry and 10-16 infantry in a stack, with a few loose regiments of infantry following around to siege unforted provinces and to rejoin the main stack if the war goes long)

Now, there are tons of factor that go into figuring out an army’s strength and resilience. But again, it’s not something worth micromanaging. It’s a bunch of little modifiers that add up to something great.

Two exceptions:

First, armies intended to see combat need leaders. Leaderless armies can be broken completely (disappearing from the map entirely), while even on a defeat an army with a leader will almost always just retreat (thus saving some of your men). Plus leaders give significant bonuses, especially in the early game, so a good leader is one of the few ways to give a visible boost to your army.

Second, when at peace, it’s a good idea to drive down the army maintenance slider. Your soldiers’ morale will collapse, but who cares, we’re at peace. But when you do go back to war, make sure you’ve paid your soldiers in full for a few months, because low-morale units don’t last long in combat.

Now, this has barely touched upon all the little fiddly bits that make EU4 combat. But if you want more detail, head over to the wiki.

Advertisement

Weekly Report: Rescheduling

So I decided to face reality. Given my recent health issues and some professional opportunities, I need to admit I’m never going to catch up with my backlog. So all writing of new words has been pushed back to November (that’s my NaNoWriMo project for this year, apparently)


Blog will continue. Editing will continue. Progress will continue. Novelwriting is on hiatus unfortunately as I find my footing again.


Let’s Play Europa Universalis IV: A New Start

Date: November

Country Size: 28 Provinces

Status: Depressed at my small, small size compared to how big I was last game.

Let’s get started quickly.

I have a couple of false starts (allying with Crimea and getting dragged into one of Crimea’s patented “let’s piss everyone off” war, overreaching and getting Europe angry at me) as I readjust to “not-monstrous-blob” play.

Then I start my real game. As with the previous attemot, I take my decisions, pick up advisors (ignoring the need for a Better Relations over time bonus. No save-scumming there, the minor boost it gives is pretty much irrelevant when compared to doing smart Aggressive Expansion management.)

Then I set up my alliance with Bohemia, and go with my usual opening of wiping away Albania and Byzantium. Then I take on Trebizond and Theodoro. Then Poland and Lithuania again decide not to form a personal union. Cool start.

And then Qara Qoyunlu eats Aq Qoyunlu. Whoa. That’s… actually a fairly significant development, setting me on a path to war against Qara Q early.

And then I get a random event that’s usually no big deal. I’m about to click it away then I realize it means I could get a development discount in Edirne, one of the province in Thrace, my capital region. Ergo… it’ll be cheaper to force the Renaissance there when it appears, meaning this isn’t an irrelevant event, it’s a major boon.

Then I notice that somehow, Ramazan, one of the minor countries on my south has allied with the Mamluks. It’s bothersome but not a huge issue – I think. It’s not something that usually happens, so hopefully this means the Mamluks failed to get one of their more significant alliances up, but I’ll need to check that out.

Really – this game just got interesting. That’s not how the early game usually pans out. Typically, Qara Qoyunlu will take its time vassalizing Georgia, letting me eat reconquer Aq Qoyunlu. And the Mamluks ignore Ramazan, letting me eat them without trouble. Interesting times.

Over the course of the next few wars, I slowly build up my territory, recovering cores and capturing the small local powers. Those wars are pretty much formalities: crush the small opposing force, siege everything, win. Then I vassalize Georgia, triggering the first coalition of minor powers against me. Time to let the men take a breather.

Oh, also, the Renaissance happened.

MECHANICS: Institutions

Institutions are the current system intended to simulate the evolution of technology. In the time period covered by EU4, Europe saw rapid technological development while most of the rest of the world didn’t. The idea behind Institutions is that they’re the cultural forces which made that fast technological progress possible.

How they work is that as soon as an Institution appears, technological costs go up for all countries that haven’t Embraced the institution. It’s a small tick (1% per year, topping at 50% per institution) that ends up being prohibitively expensive.

If you have the right expansion installed (Common Sense) you can spend monarch points to develop provinces, which also speeds up adoption of an institution in a province. It’s the only way you can affect Institution spread inside a province, with one exception.

Institutions are adopted over time by provinces – each province slowly ticking upward to adoption. And once provinces totalling 10% of your Development value have fully embraced an Institution, you can force the rest of your country to embrace it, erasing the tech cost penalty at a rather high cost in ducats.

Lots of factor affect institution spread (and they vary depending on the institution), but at least in the case of the early institutions like the Renaissance and Colonialism, you’ll want to force one of your provinces to adopt the institution as fast as possible, so that it can then spread more quickly to surrounding provinces.

The thing to understand is that institution spread is incredibly slow except for that Friendly province factor. Waiting for the spread to occur naturally means you’ll have to buy multiple tech levels at a large penalty. So it makes sense to throw monarch points at a province, just to get the institution in one province to start that faster spread.

Just My Opinion: At the Sign of Triumph

I’m a huge David Weber fanboy.

Scratch that. I’m a huge fan of his Honor Harrington series, as well as of some of his other works.

The Safehold series, of which At the Sign of Triumph is part… not so much.

It’s well-written, but it really suffers from two major issues:

1-Unwarranted Doorstopper Syndrome. It’s, so far, nine big books long… for a series that could probably have been pared down to maybe six medium-sized books. The problem is that Weber really wants to give the readers at least a quick look at every major engagement in a world-spanning war. Which leads to a lot of awfully formulaic “Character X’s viewpoint of Battle Y, whose outcome is pretty much a foregone conclusion.” That’s bad enough… but then there’s problem 2.

2-Tech-Driven Lack of Tension: The main conceit of the series is the rapid reintroduction of various bits and pieces of technology. The good guys benefit from that, while the bad guys are effectively opposing the introduction of that tech. Then to compound that, the main protagonist has indistinguishable-from-magic levels of tech available to her as well.

Which means that those near-identical battles? They’re almost always of the “bad guys show up, get curbstomped by whatever new toy the good guys have this week.”

I think Weber wanted to show the entirety of the conflict and the detail of the evolution of military tech… which is interesting from a very dry worldbuilding/world management perspective, but really makes most of the books in the series feel the same. And At the Sign of Triumph, despite being at least the end point of the first major arc of the series, doesn’t buck the thread.

There’s a supposedly big military conflict looming for most of the book – but it gets neutered by a simple intelligence ploy (in a series where the bad guys’ spies have been ridiculously ineffective from day one.) There’s one last series of naval battles which are just a victory lap for the good guys’ navy (because the naval war was conclusively won at least two or three books ago.) And ultimately the big bad gets taken down for the count in a handful of pages by minor characters, yet another application of magic tech, and a logical but utterly undramatic series of events… which coincidentally doesn’t resolve the core conflict of the book, so that another series taking place 25 years later can be written on the same premise.

So… not a recommendation, unless you have an enormous amount of free time available, or a passion for the nitty-gritty of Age of Sail/Early steam naval warfare.

Weekly Report

Well, I’m slowly beating my backlog into submission. With this post I’ll be up to date on blog content, I’m catching up (slowly) to where I want to be on revisions for Book the First, and I’ve completely cleared my free-time schedule so I should be able to make up some lost ground on the actual writing of books.

In addition, I have another work-light week, so I should be able to keep making progress at a good clip.

I really want to diversify my projects a bit – in particular, I want to get started on the blog redesign and theme. But that’s a reward I’ll give myself once I’m closer to being in control of my workload.

The whole “scrubbing out on the LP” was in theory a setback, but honestly, I wasn’t that happy with my blog post anyway. So it’s a mixed blessing – the content I’ll eventually produce there will be better than it would have been otherwise.

So – back to work! And by that I don’t mean (just) playing EU4. I think.

Let’s Play Europa Universalis IV – Getting Re-started

… and we’re done. Great run, but we just couldn’t do it.

Heh. Actually, I made it to 1710, had my best game yet, but then I got greedy and triggered a coalition war. I could probably play the game out, but between that, a few other dumb mistakes and a lot of small, suboptimal plays, I don’t think that particular World Conquest is salvageable.

I learned a lot, though, and I’m not about to quit such an interesting project.

So I’ll restart in a couple of days. Meanwhile, here are some of the lessons I learned during this playthrough.

1-Fight wars to 100% warscore (or near to 100%) – in the early stages of the game, I wasted lots of time and manpower by going for early peace agreements. That’s a crushing mistake: by the time the enemy is willing to sign a peace deal at 35% or so, you’ve generally won the war anyway. Driving up the warscore higher is a formality by then.

2-Focus my aggression. It’s not always possible, but it’s better to kill off a nation completely than to have it stick around with 150 AE. That’s something I should absolutely have done throughout the entire run. The coalition that ruined me in the end wasn’t a huge European blob, it was a dozen country from all across the world.

3-Don’t ignore the economic game. In this playthrough I learned the importance of trade, but also that ignoring the invest-reap rewards value of buildings and ships was deadly.

… and tons and tons of nifty little tricks.

We’ll see how it works out.

Bonus Creativity: Port Roven, in Broad Strokes

When creating RPG settings, cities are actually really tough to get right. They have to be more than just a collection of adventurer-related businesses and quest givers, which means they’re going to require work. But it’s all too easy to go overboard and waste time creating pointless background that’ll get ignored forever.

In a sandbox setting, you probably ought to err a bit on the side of parcimony, at least until you have a good read on your players’ intent. But there are exceptions to that rule, and one of them is that the starting city needs to be able to both sustain adventures and encourage the players to explore.

Which means it needs to 1-have enough color that the party wants to stay there, 2-have plenty of hooks, to let the players pick their fun, and 3-have an obvious link to the broader setting.

Point 1 is enough to justify an entire post on its on. It’s details on what we’ll work on today.

As to point 2, let’s have a look at the hex again, and especially at our adventure hooks:

Well, we know from the previous post that there’re are rumors of a monster in Moose Lake and goblins in the Old Watchtower. We want to introduce those hooks from the start.

The Monster rumors are going to be of the “local legends” variety (to be detailed in a future post.)

For the goblins, it’s simpler: everyone knows in the city that the local army detachment (which doubles as the local police) always has odd jobs for adventurers, since it’s chronically overwhelmed. That’s also why they tolerate adventurers’ antics. So the players will be told, flat out, that the army can be a source of adventures.

That bit of trivia opens up some options, too. The army is supposed to handle crime, but obviously they aren’t trained for that purpose, which means there’s a small-time organized crime problem in town. Not an epic fantasy thieves’ guild, but a small group of tough ex-adventurer types causing trouble. This has become a personal pet peeve of the local commander

The army is also not up to running counter-intelligence operations, which matters because Port Roven is something of a minor prize to seize, as the real city nearest the local teleport gate. It’s not yet a major city, but it could be. And politically, it’s the seat of the local government, which means it sees its share of spies and conspirators.

Finally, we know that there are some merchant companies based in Port Roven. One runs a logging camp, another is backing the mines at Three Hills (and both are always looking to hire adventurers both for legitimate exploration or security missions, and for black ops against their opponents.)

Finally, we probably also want a local wizard, as well as a religious organization, just to provide basic services. These I don’t want to involve in the adventuring aspect of the city. They might offer the occasional adventure, but neither are a source of long-term intrigue for Port Roven. That’s strictly a matter of taste, not one of design.

And point 3… will also wait. Port Roven will be a colony of one of the “old world” powers. I’ll need to describe where they fit in the grand political scheme of thing… but that’s for another day. But there’s obviously international conflict in the campaign’s future.


Let’s Play Europa Universalis IV – Getting Started

Well, it’s November 11th, 1444. We’re the Ottomans, the pale green network of provinces that occupy most of the visible part of the map.

Everyone else are obstacles to our glorious manifest destiny. Yeah, even those in parts of the world we can’t see.

Before we first unpause the game, let’s handle some housekeeping.

We have a few decisions to take. At this point, except for the obviously awesome Adopt the Devshirme System decision, they’re minor matters of administration in a Sunni country. Some of them have to be re-taken whenever we change ruler, but I doubt we’ll ever see a scenario where we don’t just adopt them all. Maaaaayyybbbee if I somehow end up changing rulers right at a time when I’m dealing with very high unrest, but that’s a stretch.

So we end up with an awesome bunch of minor positive modifiers as well as minor tweaks to our Piety (which will soon be wiped out by various declarations of war. More on the Sunni religion in a future post.)

I also choose a Mission at this time (the mission to conquer Constantinople.) As a rule, I don’t usually worry too much about grabbing very profitable urban provinces over poor rural backwaters, but Constantinople is a very, very rich province, taking it opens up the “Make Constantinople Capital” decision which brings in lots of good bonuses, and strategically I need to secure the straits to facilitate my troop movements. Plus it gives me a Casus Belli on Constantinople, which saves some diplomatic time.

I also set my national focus to Administrative. Changing the national focus means I will receive more Admin points, at the cost of receiving less Diplomatic and Military points. It’s a zero-sum game, but early on I want the admin points. I imagine I will switch the focus between administrative and diplomatic from time to time.

We also need to hire advisors. As a large, rich country, we have the luxury of actually having the budget to hire all three advisors, and even to pay for one level-2 advisor.

The big effect of advisors is to give us an increase in monarch points (one of the ressources I’ll discuss in the mechanics section at the end of this post.) They also each give a small bonus to something: with a few exceptions, those don’t matter very much. Eventually, I’ll only want level-3 advisors across the board regardless of what other bonuses they give, but that’s in the future. Right now, I do however have one specific requirement: a Diplomatic Advisor that gives a Better Relations Over Time bonus.

That’s because that bonus affects the speed at which my Aggressive Expansion penalty decays, and, in the early game, Aggressive Expansion is the biggest throttle on my expansion speed.

So in this case I hire the Diplomatic Advisor that gives me +1 to Diplomatic Power and the BROT bonus.

I also hire a +1 military adviser and a +1 admin adviser, giving me bonus Prestige and bonus Morale. The bonus to Prestige is nice in that over time it will also reduce my Aggressive Expansion. But it’s a small thing, and I almost elected to take a +2 admin adviser that gave me more money instead.

Then I micromanage my fleet, sending my light ships on trade protection missions and merging my military fleet into a big blob of ships. I send my merchants on trade missions (then forget about them for the balance of the game… or so I think at the time.)

Finally, I deal with my early game diplomacy. I send off an alliance offer to Bohemia, revoke the guarantee to Ragusa, and send someone to forge claims in Hungary. Typically, Hungary gets weakened by some wars at that point, and I figure any easy land grabs in Europe have to be made. Generally, I won’t detail what my diplomats are doing: they’ll spend their time building spy networks or schmoozing.

Then I unpause, and wait the long month before the game will let me declare wars. I move my troops and fleets where they will need to be, I assign one general to my army ready to march on Constantinople, hire another general to lead my armies into Albania, hire a couple extra regiments…

All minor things that are probably me micro-managing too much. As I mentionned, the big limiter on my growth in the early game is Aggressive Expansion, and I’m almost certain I’ll end up having to wait a couple of years without waging wars to let it decay.

So we let the month past, and on December 11 I declare war on Albania. It’s a priority target because Venice also wants it, and I need my armies to be sieging the province ASAP. Then I send my armies in, the obviously unfair fight resolves, and we set down to siege.

Meanwhile, a month passes and I can declare war on Byzantium. This also puts me at war with Athens, but who cares. The army of Albania (minus a siege contingent) can take care of Athens and the Byzantium provinces there.

Then it’s time to wait out the sieges. My fleet can blockade every single province currently under siege, so I use them well to speed up sieges. Without going into details, sieges work by repeated rolls, you need several successes on those rolls to win the siege, and each success increases the odds of another success. So an early blockade helps getting more successes earlier, which speeds up the siege.

Realistically, none of my opponent stand a chance. On March 12th, 1446, I annex Byzantium and their vassal Athens. Albania I swallowed a few months ago.

… and that’s enough words for now. Let’s take a break as we celebrate our victories (and subsequent Full Annexations of Byzantium, Athens and Albania. I do the post battle chores (building cores, making Constantinople our new capital, and consolidating my forces) but our next conquests will be in a further post.

Mechanics overview : Ressources

There are five important ressources in Europa Universalis 4, plus one that’s only really relevant in very specific scenarios.

The first is money (counted in ducats): it’s generated by your economy, it’s used to pay for maintenance of basically everything, and also to purchase stuff like ships and regiments, or to hire mercenaries.

As a rule, it’s not something I worry too much about beyond trying to run a balanced budget. Having an enormous treasury just isn’t much of a help or necessity (the one exception being paying to enforce the adoption of Institutions.) Even in those case, taking the occasionnal loan isn’t a major problem.

However… running at a deficit forever is a path to disaster. Eventually, you end up in a debt spiral that ends with bankruptcy, and while in a normal game you can recover from that, in a challenge situation you can’t afford the lost time.

The important second ressource is manpower: the number of men available for recruitment into your army or for reinforcements. That’s based on how many provinces you have, plus a bunch of modifiers. In a world conquest situation, you are going to be at war basically constantly, and this will remain relevant well into the second half of the game. I expect that at some point I’ll have enough land that my manpower will replenish faster than I can spend it, but by that point we’ll be in mop-up mode.

The third ressource is sailors: it’s the one ressource I called not really relevant. It’s basically manpower for ships. And since the Ottoman early and mid-game is entirely ground based, it’s never really something I think about. It may become important at some point (although I personnally doubt it) but even if it does, at that point it’ll be a pretty big number.

The fourth, fifth and sixth ressources are monarch points, split into three categories: Administrative, Diplomatic and Military.

You earn some every month, based mostly on your ruler and on your advisors. You spend them to buy technologies, Ideas, and for specific purposes related to their category. Beyond that, Admin points are mostly used to integrate provinces into your country (via a process called coring) and to increase your stability (which brings in lots of small bonuses.) Diplomatic points are used when enforcing peace deals and to integrate vassals into your country. Military points are used essentially to hire generals, to perform some military actions, and to “pacify” provinces that are close to rebellion.

By far, monarch points (and especially admin and diplo points) are the most valuable ressources. I will consistently take missions that give them as rewards over other missions that give me less relevant rewards. By the same token, bonuses that let me save on the amount of those points I have to spend are also at a premium.

Weekly Total Lack of Progress Report

Hopefully, this post title won’t be prophetic.

So yeah… last week was a complete nightmare of work and responsibilities, leaving me little to no time to even consider doing basic tasks. The payoff is this week: I have a full day off on Tuesday (with neither girlfriend nor son at home), and really short work days besides.

Basically, all my excuses to not work are gone. So I really need to post some good progress this week.